What Maestro is good at
Maestro is a declarative UI testing framework for mobile and web flows. You describe a customer journey in YAML, connect to a running app on an Android emulator or iOS Simulator, and let Maestro drive the interface.
The useful distinction is this: Maestro is excellent for high-value user journeys and smoke coverage. It should complement, not replace, unit tests, API checks, component tests and exploratory testing.
This guide walks through a maintainable setup for a small mobile automation suite and finishes with a CI and cloud execution path.
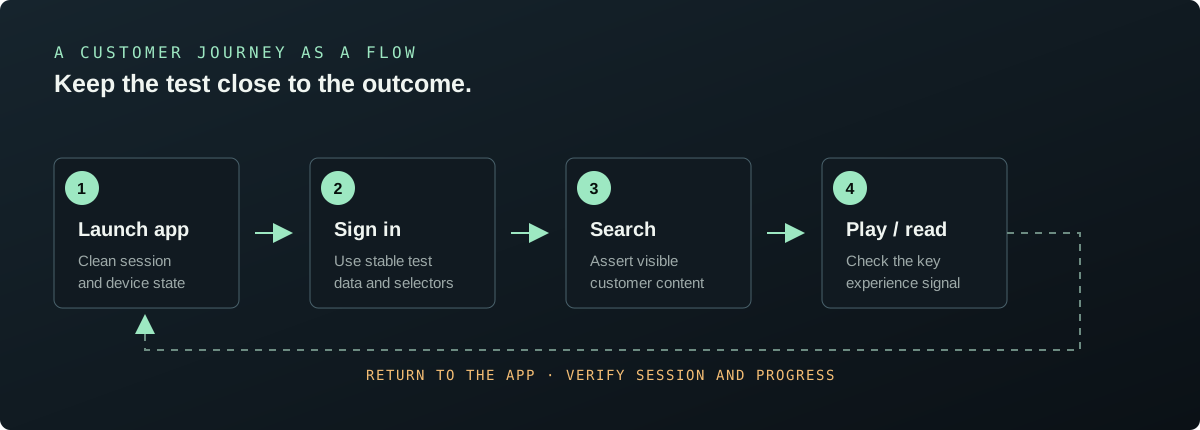
Visual 1 — Model a flow around a customer outcome, not around a collection of screens.
Step 1: Prepare the test environment
Before writing YAML, make sure the target device and app are ready.
Android
- Install Android Studio.
- Create an Android Virtual Device from Virtual Device Manager.
- Start the emulator and confirm that
adb deviceslists it. - Build and install a debug or release-candidate APK.
- Record the package ID, for example
com.example.reader.
iOS
- Install Xcode and select the Command Line Tools in Xcode → Settings → Locations.
- Open an iOS Simulator with Xcode → Open Developer Tool → Simulator.
- Build and install the simulator-compatible
.app. - Record the bundle identifier.
- If simulators are missing, run
xcodebuild -runFirstLaunchand install an iOS runtime from Xcode → Settings → Platforms.
The official QuickStart is the best source for current operating-system and simulator requirements because supported versions change over time.
Step 2: Install Maestro
Maestro offers a desktop application and a CLI workflow. The desktop application is useful for discovering devices and recording the first flow. The CLI is the better fit for source control and CI.
Use the official installation instructions for your operating system, then verify the installation:
maestro --version
maestro --help
For a command-line-first setup, follow the installation instructions in the official Maestro CLI documentation rather than copying an old installer command into a build machine.
Step 3: Create a flow workspace
Keep flows in a predictable directory. A useful starting structure is:
.maestro/
├── smoke.yaml
├── login.yaml
├── search-and-play.yaml
└── subflows/
    ├── reset-test-user.yaml
    └── sign-in.yaml
Top-level flows are release signals. Files under subflows/ are reusable building blocks invoked with runFlow and should not run as independent tests.
Create the first flow:
mkdir -p .maestro/subflows
touch .maestro/smoke.yaml
Step 4: Write the first flow
Start with one customer-visible outcome. This example launches a reader app, signs in, searches for a title and verifies that the library is visible.
# .maestro/smoke.yaml
appId: com.example.reader
---
- launchApp:
    clearState: true
- assertVisible: "Welcome back"
- tapOn: "Sign in"
- tapOn:
    id: "email-input"
- inputText: "qa-user@example.test"
- tapOn:
    id: "password-input"
- inputText: "${QA_PASSWORD}"
- tapOn: "Continue"
- assertVisible: "Your library"
- tapOn:
    id: "search-button"
- inputText: "The Quality Engineer"
- tapOn: "The Quality Engineer"
- assertVisible: "Start reading"
- takeScreenshot: "reader-ready"
The flow is intentionally readable. A developer should be able to understand the product journey without opening the test runner.
Step 5: Choose stable selectors
Selector quality is the difference between a useful suite and a flaky suite.
Prefer this order:
- Accessibility labels and identifiers that represent user intent.
- Stable test IDs exposed by the application.
- Visible text when it is part of the product contract.
- Coordinates only as a last resort.
For example, an application should expose a stable identifier for an important control:
- tapOn:
    id: "search-button"
Avoid selectors that depend on layout position, generated text, animation timing or a localized string unless the test is explicitly validating that locale.
Make the app testable
Testability is a product capability. Agree with developers on identifiers for critical actions such as sign in, search, play, pause, subscription and logout. Keep identifiers stable while allowing the visible text to change with design and localization.
Step 6: Reuse setup with subflows
When the same sign-in path appears in many tests, isolate it:
# .maestro/subflows/sign-in.yaml
- tapOn:
    id: "email-input"
- inputText: "qa-user@example.test"
- tapOn:
    id: "password-input"
- inputText: "${QA_PASSWORD}"
- tapOn: "Continue"
- assertVisible: "Your library"
Call the subflow from a journey:
appId: com.example.reader
---
- launchApp:
    clearState: true
- runFlow: subflows/sign-in.yaml
- tapOn:
    id: "search-button"
- inputText: "The Quality Engineer"
- assertVisible: "Start reading"
A subflow should hide repeatable mechanics, not hide the business intent of the test.
Step 7: Run locally
With a device or simulator running and the app installed:
maestro test .maestro/smoke.yamlRun a directory when you want the complete local smoke pack:
maestro test .maestroIf a command is not recognized by the installed version, use maestro test --help and the official command reference for the version on your machine. Keep the CLI version visible in CI logs.
Debug a failure systematically
- Run only the smallest flow that reproduces the failure.
- Confirm the target device and app build are the expected ones.
- Inspect the current view hierarchy using Maestro's supported inspection tools.
- Replace a brittle selector with a stable ID or accessibility label.
- Add a screenshot at the last known-good state.
- Check whether the failure is UI, identity, network, test data or device state.
- Remove temporary waits after the root cause is fixed.
Do not cure a timing problem by adding large sleeps everywhere. Wait for a visible state or a meaningful application condition instead.
Step 8: Design for permissions and test data
Permission dialogs and first-run onboarding are part of the mobile state machine. Decide whether each flow should:
- Start with a clean install and handle permissions.
- Start from an authenticated, seeded test account.
- Use a reset hook before the flow.
- Validate the permission path in a dedicated flow.
Keep secrets out of YAML files. Pass environment-specific values through the supported environment-variable or CI secret mechanism, and make sure logs do not print passwords, tokens or recovery codes.
Test data should be deterministic. A flow that searches for a title or subscription should not depend on a shared account that another test can mutate at the same time.
Step 9: Add API and mobile evidence together
A mobile failure often has a backend cause. Pair the UI flow with API and service-layer checks so the failure can be isolated quickly:
UI flow fails
    ├── Screen state or selector problem
    ├── Authentication or identity problem
    ├── API contract or service problem
    └── Device, permission or network problem
The mobile flow proves the customer journey. API checks prove the service contract. Together they provide faster root-cause analysis than either layer alone.
Step 10: Put Maestro into CI
Start with a small smoke flow on pull requests. Run a wider device matrix after merge or before release. The goal is fast feedback first, then confidence at the right stage.
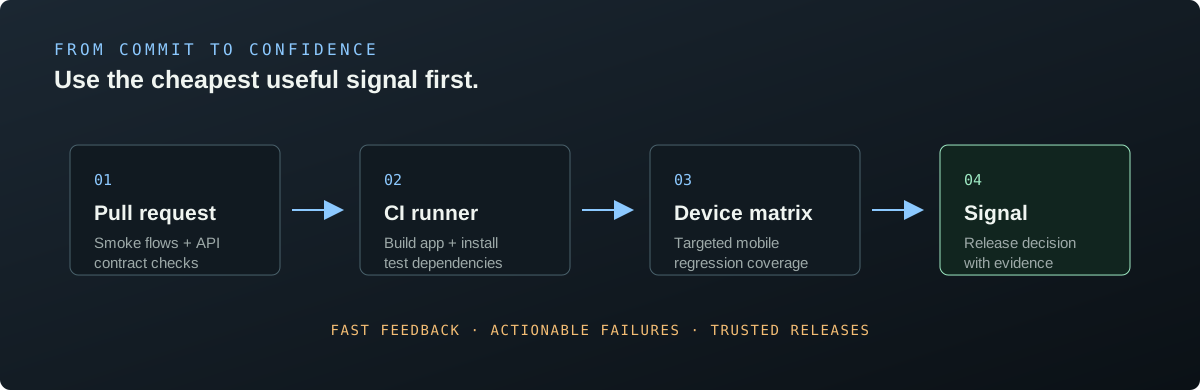
Visual 2 — Put the cheapest useful signal first, then increase coverage as the change moves toward release.
A repository might use this layout:
.maestro/
├── smoke.yaml              # Pull-request signal
├── critical-purchase.yaml  # Release-critical journey
└── subflows/
For GitHub Actions, keep the app build and test steps explicit. The exact action version and inputs should follow the current official Maestro GitHub Actions documentation:
name: Mobile smoke

on:
  pull_request:

jobs:
  maestro:
    runs-on: macos-latest
    steps:
      - uses: actions/checkout@v4
      - name: Build mobile test app
        run: ./scripts/build-test-app.sh
      - name: Run Maestro flows
        run: maestro test .maestro/smoke.yaml
If you use Maestro Cloud, store the API key as a repository secret and keep the project ID in configuration or a non-secret repository variable. A generic cloud command looks like this:
maestro cloud \
  --api-key "$MAESTRO_CLOUD_API_KEY" \
  --project-id "$MAESTRO_PROJECT_ID" \
  --app-file app-release.apk \
  --flows .maestro
A failing Flow should return a failing CI status. A passing Flow should publish enough evidence—screenshots, logs and a run URL—for the team to trust the result.
Step 11: Define a quality bar
Before calling a flow release-ready, check:
- It expresses one customer outcome.
- It uses stable selectors.
- It controls account and device state.
- It does not leak credentials.
- It produces an actionable failure.
- It can run repeatedly without manual cleanup.
- It is fast enough for its place in the pipeline.
- It has an owner when the product changes.
A test count is not a quality strategy. A small, trusted set of journeys is more valuable than a large, flaky catalogue.
Common failure patterns
Element not found
Inspect the view hierarchy and confirm whether the application exposes the expected accessibility label or ID. Check that the app is on the expected screen before changing the selector.
Flow passes locally but fails in CI
Compare app build, OS image, locale, permissions, device size, network access and test data. Print versions and device information in the CI log.
Authentication is flaky
Use a dedicated test identity, seed it deterministically and keep login as a reusable subflow. If the product uses OIDC, validate the identity service separately so a mobile test does not become the only authentication check.
Tests slow down over time
Remove duplicate journeys, keep pull-request coverage focused and move broad device regression to a later stage. Measure duration and flake rate as quality metrics.
Official documentation and tutorials
- Maestro QuickStart ↗ — install the tools, connect a device and run a first Flow.
- Writing Your First Flow ↗ — first YAML flow and local execution.
- Maestro CLI overview ↗ — CLI concepts and commands.
- Maestro reference and selectors ↗ — commands and interaction patterns.
- Running Flows on CI ↗ — generic CI integration.
- GitHub Actions integration ↗ — official GitHub Actions integration.
- Run tests on Maestro Cloud ↗ — cloud execution and reports.
- Official Articles & Tutorials ↗ — community tutorials and examples.
- Maestro GitHub repository ↗ — source code and issue tracker.
Final takeaway
Maestro works best when the flow is readable, the app is testable and the feedback arrives early. Start with one critical customer journey, make the state deterministic, choose resilient selectors and connect the result to CI. Then expand coverage from observed risk instead of chasing a percentage.